How To Setup Custom Theme Support In ASP.NET MVC Preview 4 using a Custom ViewEngine
Update 2009/03/26: There is an updated version of this code (with improvements) that targets the ASP.NET MVC 1.0 RTW located here: /post/2009/03/ASPNET-MVC-Implement-Theme-Folders-using-a-Custom-ViewEngine.aspx
Update 8/29/2008: I posted a new blog post today that contains updated code for this example that works with the newly released ASP.NET MVC Preview 5. The new code is located here.
One option to do theming in ASP.NET MVC is to use the standard ASP.NET Theme functionality (App_Themes folder glory and all), but it just doesn’t seem complete. Also, by doing that you don’t get to generate completely custom HTML specific to each Theme. After all, the beauty of ASP.NET MVC is being able to completely control the HTML output of the application. So, I played around with things a bit and figured out how to create a custom ViewEngine that will allow you to create a seperate sub-folder within the Views folder for each Theme. This way you can have a completely different version of each View for each Theme, and maintain complete control over the HTML output on a per Theme basis.
I used the ASP.NET MVC Preview 4 release to write this article.
Create Themed Views
First, we’ll make some changes to the Views contained within the default ASP.NET MVC Template.
Here’s a brief summary of what changes are needed:
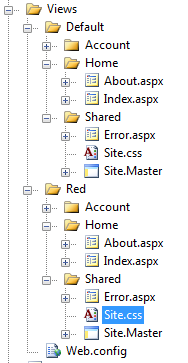
- Create a sub-folder named "Default" within the Views folder, and paste all the files and folders within the Views folder into this folder. This will be out "Default" theme.
- Cut the Site.css file from the Content folder, and paste it into the Shared folder within the newly created "Default" theme folder.
- Modify the CSS link reference in the "Shared/Site.Master" file within the "Default" theme to reference the new location for the Site.css file.
- Modey all the .aspx View pages to reference the new location of the MasterPage file.
Once, the above changes are made we have our first “Default” theme created. Now to create a new theme, just create a copy of this folder and make sure to update all the references within the files to reference the theme folder the files are contained within.
To the right is a screenshot displaying the layout of the Theme folders as described above.
In the code example attached to this article, I created a second theme named “Red” and I changed the background color of the Site.css file to the color Red.
Create a Custom ViewEngine
I found the following article usefull and very descriptive on creating custom ViewEngines, so I’m not going to re-write it. Just refer to the following link on how to create a custom ViewEngine in ASP.NET MVC.
Instead, I’ll just list the code I wrote for setting up Themes and give a brief description of what it does.
First, we need to create a ViewLocator object that will contain VirtualPath references that describe to ASP.NET MVC how to find a specified View. To make things simpler I’m just inheriting from the WebFormViewLocator so I don’t have to re-implement it’s entire logic. Also, one thing to note is the constructor of our WebFormThemeViewLocator object takes a string argument that is the name of the Theme it is to describe the VirtualPath references for.
public class WebFormThemeViewLocator : System.Web.Mvc.WebFormViewLocator
{
    public WebFormThemeViewLocator(string themeName)
    {
        base.ViewLocationFormats = new string[] {
            "~/Views/" + themeName + "/{1}/{0}.aspx",
            "~/Views/" + themeName + "/{1}/{0}.ascx",
            "~/Views/" + themeName + "/Shared/{0}.aspx",
            "~/Views/" + themeName + "/Shared/{0}.ascx"
        };

            base.MasterLocationFormats = new string[] {
            "~/Views/" + themeName + "/{1}/{0}.master",
            "~/Views/" + themeName + "/Shared/{0}.master"
        };
    }
}
Next, we need to create a custom ViewEngine. Also, in this case, I’m inheriting the WebFormViewEngine so I don’t have to re-implement it’s entire logic. This WebFormThemeViewEngine just overrides the RenderView method so that it can get the Theme to display from the HttpContext.Items collection and implement the new WebFormThemeViewLocator instead of the default WebFormViewLocator.
public class WebFormThemeViewEngine : System.Web.Mvc.WebFormViewEngine
{
    protected override void RenderView(System.Web.Mvc.ViewContext viewContext)
    {
        string themeName = viewContext.HttpContext.Items["themeName"] as string;
        if (themeName == null) themeName = "Default";

        base.ViewLocator = new WebFormThemeViewLocator(themeName);

        base.RenderView(viewContext);
    }
}
Next, we need to create a custom ControllerFactory that we’ll setup ASP.NET MVC to use so we can use our custom ViewEngine. Again, I’m inheriting the DefaultControllerFactory so I only have to add the necessary logic to use the custom ViewEngine so I don’t have to re-implement it’s entire logic.
public class WebFormThemeControllerFactory : System.Web.Mvc.DefaultControllerFactory
{
    protected override System.Web.Mvc.IController CreateController(System.Web.Routing.RequestContext requestContext, string controllerName)
    {
        System.Web.Mvc.Controller controller = base.CreateController(requestContext, controllerName) as System.Web.Mvc.Controller;
        controller.ViewEngine = new WebFormThemeViewEngine();
        return controller;
    }
}
Finally, to tell ASP.NET MVC to use the WebFormThemeControllerFactory object, and ultimately our custom ViewEngine, the following line of code needs to be added to the Application_Start event handler:
ControllerBuilder.Current.SetControllerFactory(typeof(WebFormThemeControllerFactory));
Dynamically Determine Which Theme to Display to the User
The way I’ve set things up in the above code for the custom ViewEngine, I’ve wired it up so that you can set the Theme to display anywhere within your Controller. This gives the most flexibility I could think of to set the Theme since you’ll most likely need to access a database of some kind to determine which Theme to display, and this way you can do that before, after or at the same time you get the data to display.
Here’s an example of how to set the Theme to “Red”, and you can do this anywhere within one of your Action methods of your Controller.
controllerContext.HttpContext.Items["themeName"]
The reason I’m storing the Theme Name using HttpContext.Items is so that we can access the Theme Name from a single place within both the custom ViewEngine and the View itself.
Also, the code example attached to this article uses a ControllerBase class that each of the Controllers inherit so it’s more resuable, and it also grabs the Theme to display from the QueryString for simplicity.
Sharing UI Elements Between Themes
One thing that is done alot is sharing certain UI elements between Themes that are similar or almost identical. This can be done by creating user controls within a seperate folder than the View folder, and using/referencing them within the Pages/Views (.aspx) or Controls (.ascx) within the Themes. This way you can create shared UI elements that can be shared across multiple Themes.
In the code attached to this article, I’ve created a “~/Controls” folder and placed in it a ThemeLinks.ascx control that is used by both the “Default” and “Red” themes to display links (as tabs in the top navigation bar) for you to select which Theme to see.
Download the Code
Ok, after reading all the above, I’m sure you’re probably a little confuses since I only gave a brief overview. Well, here’s the code. I started with an ASP.NET MVC Website (as described in one of my previous posts) using the Preview 4 release and made all the changes described above. Have fun, and please post any comments you have on this, or any suggestions on making it better.
Download Code: ASPNETMVC_CustomThemeImplementation.zip (207.98 kb)
Recent Posts
-
C#: Console App that Accepts Command-Line Arguments
23 Apr 2024 -
C#: How to iterate over a dictionary?
20 Apr 2024 -
C#: What is the difference between 'string' and System.String?
16 Apr 2024 -
Include Javascript File in Another Javascript File
22 Mar 2024 -
Javascript: How Closures Work
22 Mar 2024


