Using LINQ to SQL with SQL Server Compact Edition
I’m currently building a desktop application that needs to store a bunch of data on the users computer, so I’ve decided to use SQL Server Compact 3.5 for this. There’s only one problem, Visual Studio 2008 doesn’t support using LINQ to SQL with SQL Server Compact. However, the .NET Framework does and there’s a work around to get it working in VS’08 that I’ll describe below.
In case you aren’t aware of what SQL Server Compact 3.5 is, here’s the short description that Microsoft gives on their website: “Microsoft SQL Server Compact is a free SQL Server embedded database ideal for building standalone and occasionally connected applications for mobile devices, desktops, and Web clients.” You can download it and view more information here: http://www.microsoft.com/Sqlserver/2008/en/us/compact.aspx
Steps to create a LINQ to SQL application using SQL Server Compact
To make this easy to follow I’m going to start with Creating a Solution in Visual Studio and go through all the steps needed to get it running off of SQL Server Compact.
Also, you’ll first want to make sure you have SQL Server Compact 3.5 installed. It may have been installed when Visual Studio 2008 installed; I’m not sure which editions install SQL Server Compact 3.5, when I installed Visual Studio 2008 Team Suite it did install SQL Server Compact 3.5 too. If you need to install it, you can find the installer here: http://www.microsoft.com/Sqlserver/2005/en/us/compact-downloads.aspx
Step 1: Create your new project within Visual Studio
It doesn’t matter if it’s a Windows Forms or WPF applciation. For this example, I’ll be creating a WPF application.
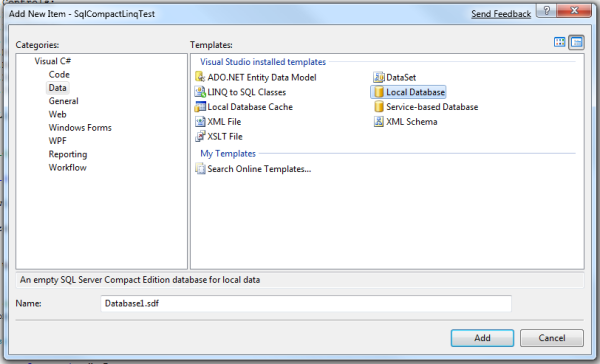
Step 2: Create your SQL Server Compact database. For Example: MyDatabase.sdf
You can do this by right-clicking on your Solution within the Solution Explorer and selecting “Add - New Item…” then select the “Data” category on the left and “Local Database” on the right.
Step 3: Add some Tables to the Database
You can do this within Visual Studio 2008 using the “Server Explorer”. The easiest way to open up the Database within the Server Explorer is to just double click it withinthe Solution Explorer.
Also, in this example I’m just going to create a “Person” table with ID, FirstName and LastName columns.
Step 4: Create a .dbml descriptor file for the Database
To do this you need to use the SqlMetal.exe tool. Just type the following into the Visual Studio 2008 Command Prompt:
SqlMetal.exe MyDatabase.sdf /dbml:MyDatabase.dbml
By default, the SqlMetal.exe is located at drive:\Program Files\Microsoft SDKs\Windows\vn.nn\bin.
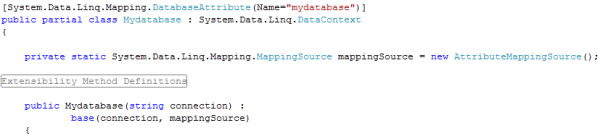
Step 5: Add the Existing .dbml file to your project
Once you add the .dbml file, Visual Studio 2008 will automatically generate the .NET code (C# or VB.NET) for the System.Data.Linq.DataContext class that you’ll use to access your data.
Step 6: Start Coding away using LINQ to SQL!
You can now code using LINQ and your new System.Data.Linq.DataContext class against your database.

A GUI UI for SqlMetal.exe
The SQL Metal Open Source User Interface Project over on CodePlex has been built just for the purpose of making it easier to generate mapping files for SQL Server Compact databases.
You can download it here: http://www.codeplex.com/sqlmetalosui
Related Links
Here are some related links on this topic:
LINQ with SQL Server Compact (a.k.a. DLINQ with SQL CE)
Using LINQ to Access SQL Server Compact Directly - A follow up
Recent Posts
-
C#: Console App that Accepts Command-Line Arguments
23 Apr 2024 -
C#: How to iterate over a dictionary?
20 Apr 2024 -
C#: What is the difference between 'string' and System.String?
16 Apr 2024 -
Include Javascript File in Another Javascript File
22 Mar 2024 -
Javascript: How Closures Work
22 Mar 2024


