Resizing and Auto-Scaling Pushpin in Bing Maps Silverlight
Jun 4, 2010 • Chris Pietschmann • Silverlight • MappingPlotting pushpins on the Bing Maps Silverlight control is really simple when using the Pushpin control that comes with the control. But, what if you want to change the size of the Pushpin? It doesn’t work to just change the Pushpin.Height and Pushpin.Width properties. This is actually because those properties pertain to the controls Content property. So, how exactly do you go about changing the size of the Pushpin if the Height and Width properties don’t work?
Use ScaleTransform to Resize Pushpins

The answer is simple. All you need to do is use a ScaleTransform. Below is a couple examples, one making the pushpin smaller and the other bigger.
*
*
You may have noticed that not only does the above example set the ScaleX and ScaleY properties of the ScaleTransform, but the CenterX and CenterY are also set. This is because if we don’t set the CenterX and CenterY appropriately the Pushpin will get “moved” from its correct location when the Transform is performed.
How did I decide to set CenterX to 17 and CenterY to 35? Well, the Pushpins “default” size sets the Width equal to 34 and Height to 35, and the PositionOrigin to BottomCenter. Since the PositionOrigin is set to BottomCenter, in order to get the pushpin to stay in its correct position on the map we need to set the CenterX to half the Width or 17, and CenterY to the Height or 35.
The image to the right shows an example of this in action.
Auto Scale Pushpin with Map Zoom Level

A neat feature that becomes available with the Bing Maps Silverlight control once you start using ScaleTransforms to modify the size of Pushpins is the ability to change the size of the Pushpins when the Map Zoom Level is changed. All it takes is a little help from a custom IValueConverter and a little Data Binding.
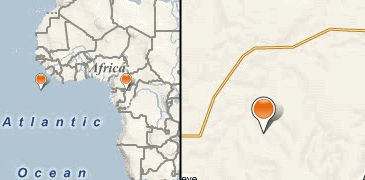
The image to the right shows this in action. Both sides of the image were not resized at all, the difference in size of the Pushpins is due to the usage of the following code.
First, we’ll add some Pushpins to a Map and set the Pushpins RenderTransform property binding to bind it to the Map’s ZoomLevel property and set it to use a custom converter.
Next, make sure you declare the PushpinScaleTransform static resource in the UserControl, Page or App. Also, don’t forget to include the namespace, in the below example I named it “local”.
*
</UserControl.Resources>
Finally, add the PushpinScaleTransform custom IValueConverter object to the project. This custom IValueCoverter will recieve the ZoomLevel and “convert” it to a ScaleTransform with ScaleX, ScaleY and CenterX, CenterY properties set appropriately to Auto Scale the Pushpin with the Map ZoomLevel. Below is an example of this that I found works quite well.
using System; using System.Windows.Data; using System.Windows.Media;
*namespace SLBingMapsScalePushpins { public class PushpinScaleTransform : IValueConverter { #region IValueConverter Members
    public object Convert(object value, Type targetType, object parameter, System.Globalization.CultureInfo culture)
    {
        double currentZoomLevel = (double)value;

        // Calculate the scale to use. This is just a simple algorithm that
        // I found works nicely.
        var scaleVal = (0.05 * (currentZoomLevel + 1)) + 0.3;

        var transform = new ScaleTransform();
        transform.ScaleX = scaleVal;
        transform.ScaleY = scaleVal;

        // Set the transform center X and Y so the Pushpin stays at the correct location.
        // The Default Pushpin's height is 35 and width is 34
        // Since the Default Pushpin's PositionOrigin is set to BottomCenter, we need to
        // set the CenterX to half the width (17), and CenterY to the height (35).
        transform.CenterX = 17;
        transform.CenterY = 35;

        return transform;
    }

    public object ConvertBack(object value, Type targetType, object parameter, System.Globalization.CultureInfo culture)
    {
        throw new NotImplementedException();
    }

    #endregion
} }* ## Download Code
Here’s a link to download a small Silverlight project that implements the above code examples.
Chris Pietschmann
Cloud Infra & Security | Microsoft MVP | HashiCorp Ambassador | MCT | Developer | Author
I am a solution architect, SRE, developer, trainer and author. With 25 years of experience in the Software Development industry that includes working as a Consultant and Trainer in a wide array of different industries.


