It’s been 8 months since the CTP release of the Bing Maps Silverlight Control at MIX’08, and finally this week Microsoft released the Final v1.0 release of the control to the web. Now, we can all finally start using the Bing Maps Silverlight Control in Production!
If you’ve worked with the CTP, then you’ll want to take a look at Ricky Brundritt’s “Migrating from Bing Maps Silverlight CTP to Production Version” article. It explains all the stuff you’ll need to modify within your project in order to gracefully switch from the CTP to the v1 Map Control.
Now for those of you who haven’t worked with the CTP…
Where to Start?
First you’ll need to make sure you have the following Tools installed:
- Visual Web Developer 2008 Express with SP1
- Silverlight 3 Tools for Visual Studio 2008 SP1
Of course you’ll also need to at least be familiar with the basics of Silverlight development. I’m mostly referring to XAML, so if your familiar with WPF that should be enough to get you started.
For those Bing Maps (formerly Virtual Earth) developers new to Silverlight; If you need a little help getting started learning the basics, here are some resources that will help you get started:
- Getting Started Building Silverlight Applications at Silverlight.net
- Silverlight Learning Resources at Silverlight.net
Now that you have all the necessary tools installed, you can go ahead and download and install the Bing Maps Silverlight v1 Control.
Download: Bing Maps Silverlight Control SDK Version 1.0
The installer will install the Bing Maps Silverlight Control within the Program Files on your computer, along with an SDK Documentation Help (.chm) file.
If you would like to see the Bing Maps Silverlight Control “In Action” and see the source code that powers each example, then you’ll want to check out the Bing Maps Silverlight Control Interactive SDK.
Display a Basic Map
Create a New Silverlight Application Project
-
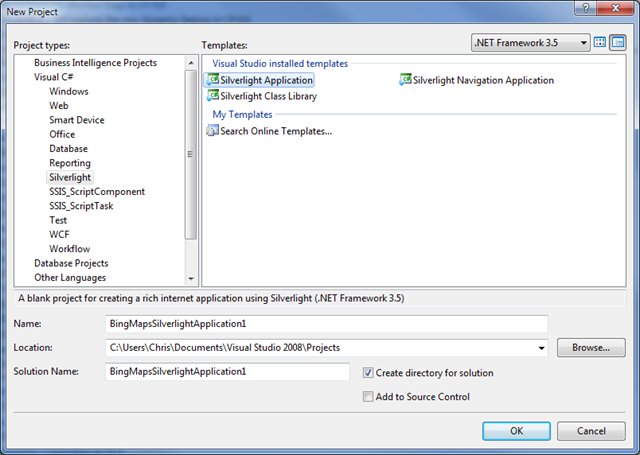
Run Visual Studio 2008 and Create a New Project using the Silverlight Application template.
-
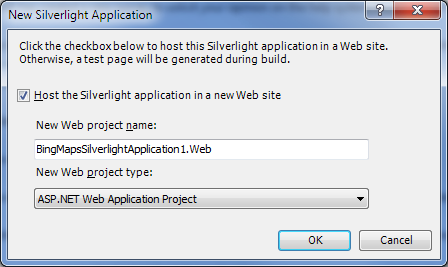
In the “Add Silverlight Application” dialog box, select “Host the Silverlight application in a new Web site” option and click “OK”. You must select this option to create an ASP.NET Web Application Project, ASP.NET Website, or ASP.NET MVC Website because the URL Access Restrictions in Silverlight require the page that hosts the Map control be hosted using HTTP in order to load/access the Map TIle Imagery.
Add a Reference to Microsoft.Maps.MapControl.dll
-
Go to the “Solution Explorer” and RIght-Click “ References” in the Silverlight Project (not the ASP.NET Web Application Project), and Select “Add Reference…”

-
Within the “Add Reference” Dialog, Select the Browse tab and navigate to the folder where the SDK is installed, then select the “Microsoft.Maps.MapControl.dll” and “Microsoft.Maps.MapControl.Common.dll” files.
Note: Be Default the SDK is installed in this folder on x64 version of Windows:
C:\Program Files (x86)\Bing Maps Silverlight Control\V1\Libraries. On x86 (or 32-bit) versions of Windows it’s installed within theProgram Filesfolder instead ofProgram Files (x86).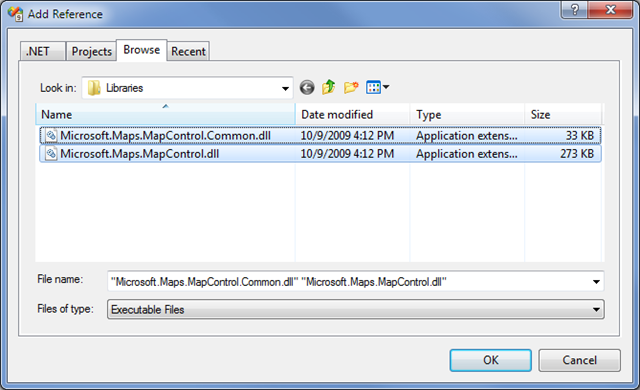

Display a Bing Maps Map
-
Add a Namespace declaration to Page.xaml for the Microsoft Maps.MapControl namespace.
To do this add the following to the
<UserControl>tag:xmlns:m="clr-namespace:Microsoft.Maps.MapControl;assembly=Microsoft.Maps.MapControl" -
Add the Map Control to the Page by adding the following tag within the Grid in the Page:
<m:Map></m:Map>The resulting Page.xaml will look like this:
  <UserControl x:Class="BingMapsSilverlightApplication1.MainPage"
      xmlns="http://schemas.microsoft.com/winfx/2006/xaml/presentation"
      xmlns:x="http://schemas.microsoft.com/winfx/2006/xaml"
      xmlns:d="http://schemas.microsoft.com/expression/blend/2008" xmlns:mc="http://schemas.openxmlformats.org/markup-compatibility/2006"
      xmlns:m="clr-namespace:Microsoft.Maps.MapControl;assembly=Microsoft.Maps.MapControl"
      mc:Ignorable="d" d:DesignWidth="640" d:DesignHeight="480">
      <Grid x:Name="LayoutRoot">
          <m:Map></m:Map>
      </Grid>
  </UserControl>
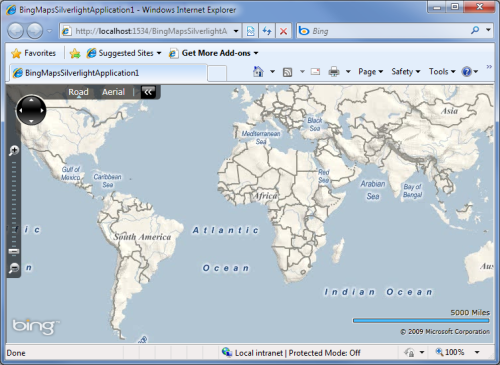
Now, when you run the application (press F5 within Visual Studio) you will see a fully interactive Bing Maps map displayed.

Setting Up a Bing Maps Developer Account

When running the above example you may have noticed the Invalid Credentials. Sign up for a developer account at: *http://www.microsoft.com/maps/developers” message being displayed over top of the Map. This is because in order for you to use the Silverlight Map control within an application, Microsoft is requiring you to setup a Developer Account for the domain you will be hosting your application in.
Setup a Bing Maps Developer Account
- Go to the Bing Maps Account Center at https://www.bingmapsportal.com
- Click the “Create an Account” link on the left side of the site.
- Sign in with your Windows Live ID
- Enter it the required Account Details
Get a Bing Maps Key
- Once you have created a Bing Maps Developer Account, just click the “Create or view keys” link on the left side of the Bing Maps Account Center website.
- Type in some Application Name. This is your name for the application.
- Type if the Application URL. This is the domain name that you will be hosting the application at.
- Click the “Create key” button. Now you have a Bing Maps Key that you can use within your application to get rid of that pesky little warning message displayed over the top of the Map and everything on it.
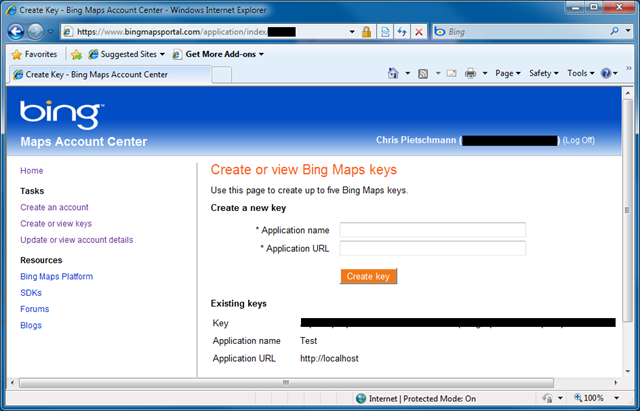
Note: For testing purposes I entered in an Application Name of
Testand Application URL ofhttp://localhost. This way I have a Bing Maps Key to use for testing/playing with the Silverlight Map Control that wont track any usage to the application I’ll eventually build.
Use the Bing Maps Key within Your Application
Now that you have a Bing Maps Key for your application, you can set your Map within that application to use this key.
To do so, just set the Map controls CredentialsProvider property value within XAML to the Bing Maps Key. Just copy and paste the key from the Bing Maps Account Center into your XAML code.
<UserControl x:Class="BingMapsSilverlightApplication1.MainPage"
    xmlns="http://schemas.microsoft.com/winfx/2006/xaml/presentation"
    xmlns:x="http://schemas.microsoft.com/winfx/2006/xaml"
    xmlns:d="http://schemas.microsoft.com/expression/blend/2008" xmlns:mc="http://schemas.openxmlformats.org/markup-compatibility/2006"
    xmlns:m="clr-namespace:Microsoft.Maps.MapControl;assembly=Microsoft.Maps.MapControl"
    mc:Ignorable="d" d:DesignWidth="640" d:DesignHeight="480">
    <Grid x:Name="LayoutRoot">
        <m:Map CredentialsProvider="[Bing Maps Key Here]"></m:Map>
    </Grid>
</UserControl>
Set Map Properties Declaratively Using XAML and Programmatically Using Code
You can change/set the Bing Maps Controls properties Declaratively using XAML, and Programmatically using Code.
Below is an example of setting the Map Mode to Aerial using XAML:
<UserControl x:Class="BingMapsSilverlightApplication1.MainPage"
    xmlns="http://schemas.microsoft.com/winfx/2006/xaml/presentation"
    xmlns:x="http://schemas.microsoft.com/winfx/2006/xaml"
    xmlns:d="http://schemas.microsoft.com/expression/blend/2008" xmlns:mc="http://schemas.openxmlformats.org/markup-compatibility/2006"
    xmlns:m="clr-namespace:Microsoft.Maps.MapControl;assembly=Microsoft.Maps.MapControl"
    mc:Ignorable="d" d:DesignWidth="640" d:DesignHeight="480">
    <Grid x:Name="LayoutRoot">
        <m:Map Mode="Aerial"></m:Map>
    </Grid>
</UserControl>
Below is an example of setting the Map Mode to Aerial using C# code:
namespace BingMapsSilverlightApplication1
{
    public partial class MainPage : UserControl
    {
        public MainPage()
        {
            InitializeComponent();

            Map1.Mode = new AerialMode();
        }
    }
}
First, in order to access the Map Control programmatically you’ll need to assign its Name property within XAML so you have a name to reference it by; like the following:
<UserControl x:Class="BingMapsSilverlightApplication1.MainPage"
    xmlns="http://schemas.microsoft.com/winfx/2006/xaml/presentation"
    xmlns:x="http://schemas.microsoft.com/winfx/2006/xaml"
    xmlns:d="http://schemas.microsoft.com/expression/blend/2008" xmlns:mc="http://schemas.openxmlformats.org/markup-compatibility/2006"
    xmlns:m="clr-namespace:Microsoft.Maps.MapControl;assembly=Microsoft.Maps.MapControl"
    mc:Ignorable="d" d:DesignWidth="640" d:DesignHeight="480">
    <Grid x:Name="LayoutRoot">
        <m:Map Name="Map1"></m:Map>
    </Grid>
</UserControl>
Additional Articles
Here are some links to additional articles on using the Bing Maps Silverlight Version 1.0 Control:
Conclusion
It’s pretty exciting that we now have a Bing Maps Silverlight control to use within our applications, and finally there is an option other than the JavaScript Control that has far superior performance when plotting over just a couple hundred Pushpins. Plus the Silverlight controls bring the full power of Silverlight to Bing Maps development; which allows for much richer mapping applications to be built.
Keep an eye out, I’ll be posting more articles/tutorials to help you out in exploring this shiny, new Bing Maps Silverlight Control.
